(Keep in mind -- you can click on the photos to enlarge).

The drive to Estes Park, CO isn't too far from where I live -- about 2 hours. The mountain passes are spectacular to say the least!

It's amazing to see the trees growing in such tight places!

When my ma and I arrive at the Estes Park Wool Market, we head first to the alpaca tent where there are lots of animals on display, (and goodies to buy!) All of the products for sale are 100% grown and made in America! (And I have to say -- I certainly did my part for stimulating the economy! Yay!)
The alpacas were wonderfully sweet to see -- just lovely creatures.

These little alpacas were recently sheared for their luxurious fiber, (and it helps to keep them cool in the summer heat!) I love the haircut on the leftmost critter -- he looks like he's literally wearing "a rug!" :-)

My FAVORITE part of the event -- the llama competition! The participants train their animals to complete various tasks simulating the natural obstacles found in their original environment. (In Peru, llamas are historically used as pack animals and must navigate the steep Andean mountains, as well as any number of blockages).
This photo is of the jumping contest. My vantage point is directly behind the bar -- the lady dressed in pink is holding it.) In the background, you can see the High Park Fire burning in the distance... more on that later.

These two are Laurel and Hardy.... Laurel is the trainer, and it's very clear that she has an INCREDIBLE relationship with her llama. He follows her every command. (And when they pass the obstacle, she kisses him on he neck! So sweet!) Here, he balks at first, but then leaps and lands safely on the other side!

Another llama leaper!

Here, the llamas and their trainers line up for the next event -- the llama limbo!

The bar on the llama limbo is getting lower, and Laurel encourages Hardy to get on his knees to pass under the bar. It was wonderful to see the camaraderie between trainers and animals!

Next, my ma and I went into the paco vicuna tent to see these gorgeous little creatures! Their fiber is some of the finest (translation: softest) on earth! (And also very highly priced/prized). They are much smaller than alpacas.

After having a snack, we went to see the goat tent. (These are all fiber-bearing critters, in keeping with the Market). This little baby is scratching herself with her horn.

This goat has a fantastic set of horns, and was only too happy to leap up for attention!

This little goat turned her head when I walked by and seemed to want a photo taken, so I obliged!

This goat was very peacefully sleeping when I walked past -- all the commotion got him tuckered out!

I couldn't resist taking a photo of this goat's glorious set of horns! Wow! They spiral so beautifully!
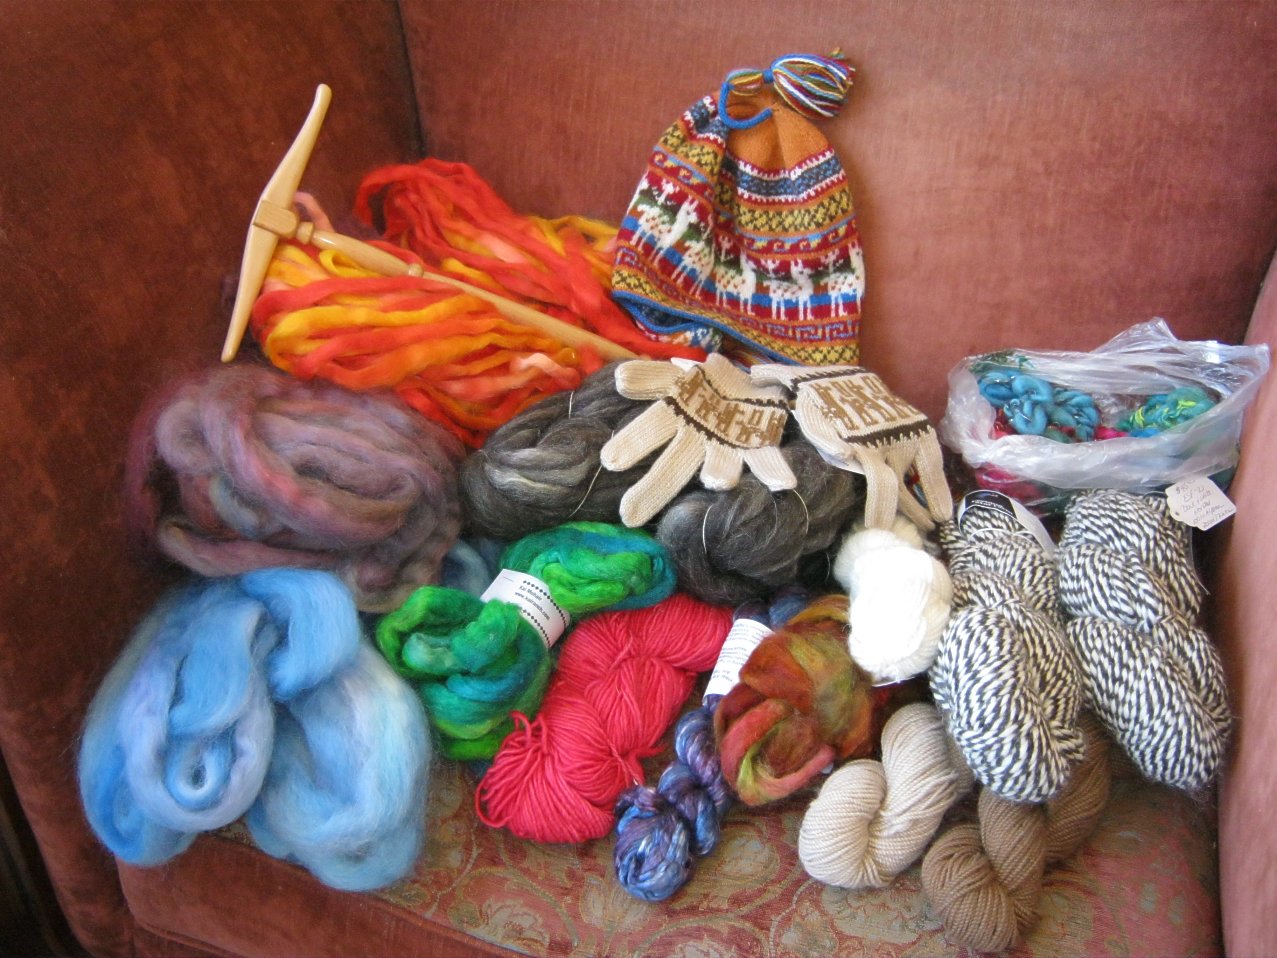
The vendor's barn was FULL of the most spectacular goodies you can imagine! From fiber arts tools, like looms, spinning wheels, and other fantastic stuff to processed fibers in all the colors of the rainbow to finished products! I bought a selection of all of the above!
I bought a beautifully-made niddy noddy from a craftsman who lives right here in Cheyenne! (and a lovely Fair Isle knitted winter hat from his good lady. The rest: on the left, the purple and blue roving is Wensleydale wool, the gray in the center is llama & silk roving. The pink is a skein of lamb's wool yarn.
On the left, the black/white and natural shades are GLORIOUS skeins of handspun alpaca yarn. (It is so lusciously soft.... mmmmmm......) As for the other colorful stuff -- the green, orange/yellow, red/green -- all mohair roving. The purple stuff in the front is bombyx silk roving. And the center gloves are hand-knit, 100% alpaca!
And... not pictured -- I got two fantastic knitting books with wild techniques therein. I also bought a new technique -- punch-needle rug making stuff. (And do I have ideas!)

The one downside to the trip was that during the day we could see the High Park fire growing. Here we are going home on I-25, about 6:00PM or so, and you can see how the fire is creating a HUGE stream of smoke.
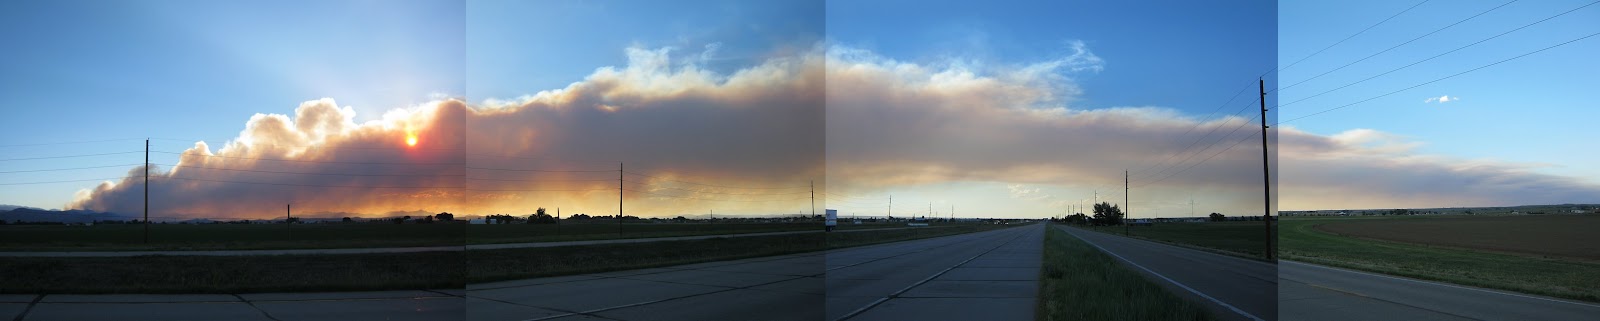
Here is a panoramic view of the smoke from the fire -- the left is a WNW view to ENE on the very right. The wind was blowing toward the NE, and when we got home, there was a huge cloud of smoke trailing all the way there and beyond into Nebraska. My heart goes out to those who are suffering under this tragic event.
Overall, a GREAT day -- I learned lots of new stuff, bought fantastic goodies, and got my yearly dose of ruminant fixation! (I just love those critters!) I can't wait to go again next year! (And I think I'll buy a loom!)


